8.29.2012

Chalkboard Messages

This was a project that I made for a teacher's lounge, but it turned out to be so pretty, I think I'll make a couple for my own kitchen. It took a little time, but it was really not difficult, and very inexpensive. 

The "silver" trays came from the dollar store. There were three pretty shapes to choose from. They are all nice, but the straighter edges of the rectangle were much easier to work with. 

Using painter's blue tape, I taped off the decorative edges. Creating the curved lines with painter's tape was the tricky part. Be as exact as you can, but if the edges aren't smooth, you can smooth them out a little after you paint with Goof Off solvent. 

With the edges covered,  spray the centers with Chalkboard spray paint. (I bought mine from Sherwin Williams.) Spray 2 or 3 thin, smooth coats- not one heavy coat. After the paint is completely dry, you can remove the tape. (Here is where the solvent comes in handy to smooth any jagged lines that may have occured.) 

You need to completely cover all of the painted area with chalk, then erase it. At that point your message board is ready to use. 

It would be pretty displayed on your counter on a plate display stand, but I wanted to hang these. Since they are plastic, you can just punch holes in them with a hammer and a good-sized nail. 

I wanted the holes to be the same on each plate so I carefully measured and marked where I wanted them to be. They were 2 inches apart and 1 inch down from the painted edge. 

Placing the plates on an old board (to give the nail somewhere to go) I hammered the holes. 

I threaded a pretty ribbon through one hole from the front to the back, around a peanut butter jar so that the hanging part of the ribbon would be the same length on all of them, then through the other hole from back to front. At that point I tied a nice bow on the front and it was ready to hang. 

This turned out really well, and looks so much more expensive than it is. I'd love to hear if you have tried this bit of craftiness and how it worked for you.

A Gift for School Teachers

Ask me at any given time what my favorite project has been, and my answer will most likely be, "the one I'm currently working on." I have a feeling, though, that this one will stay at the top for a good long while.

The PTA at my daughter's school asked me to makeover the teacher's lounge. This was a dream project from the start! I was going to get to do what I love most for people I appreciate so much. The room was pretty much a blank slate, and they gave me the freedom to do just about whatever I wanted in there. (That never happens!) The only real restriction placed on this project was the budget. I am ALWAYS up for that challenge, but the bargain hunting for this room was an all-time personal best!


The PTA not only gave me complete freedom on this project, they came in to paint the concrete block walls and the kitchen cabinets. This was no easy job! Several moms & dads worked hard all day long and still had these big smiles. Of course, it could have been the paint fumes making them hysterical.... Nah, they are just that awesome!   
What a difference a weekend and some paint can make!


So, here's where we started...


 And here's the end result...

 
We divided the room into different areas that could serve different needs. A big need here was for seating. The sofa and chairs can be a place to relax or hold a small meeting. The two side tables and ottoman tray can also be used for eating lunch or having coffee.

Eating space was another big consideration. The bar height table and chairs were already in the room when we started. We relocated the set to the back wall and gave it warmth and a sense of place with pretty salt and pepper shakers, a few plants, and place mats. 

To remind the teachers everyday how much we appreciate them, we hung silver trays painted with chalk board paint on the walls with thank you notes written on them. For the how-to's of this project, check out my Crafty page.
As much as we want our teachers to have a place to relax and recharge, sometimes a quiet work place is also necessary. We sanded and painted this old dresser to make a nice writing desk for just those occasions. We painted the insides of the drawers primary colors for a little unexpected fun.


...And the memo board. Sometimes it is necessary to post information flyers, but who says the memo board can't look gorgeous in the mean time? This one got upholstered in a pretty, nubby fabric and trimmed with silver nail heads. It adds warm color and soft texture to the concrete block wall behind the sofa, gives the wall a focal point, and can (if it HAS to) hold many, many flyers.


Teachers at Woodland Elementary, your PTA loves you, and so do I. Enjoy!

8.24.2012

New Cottage Bath


This 1910 Victorian farmhouse had no existing bath upstairs. We created a beautiful full bath from a spare bedroom. As a bedroom this space felt small. As a bath it feels bright, open and spacious. There was even extra room to add a walk-in closet.


Homemaker goes Commercial


I recently got the chance to do some design consulting and color selection for the commercial office space of Wise Property Solutions. I loved the work and I love how it turned out. Let's hope for more jobs like this in the Homemaker future!

Color Boost

  
This is just a small demonstration on what color can do. A weekend + primer + paint = a sizable energy boost in this break room kitchenette.

8.22.2012

Pretty in Pink

  
  *Sigh* This was the first room in our total house remodel that I finished. It was a small corner bedroom that was perfect for my (at the time) four year old daughter. Her only requirement was that it be pink, so that's where we started. I so loved this room. It started out as our most unpleasant space (among many!). It was painted a dingy blue-gray with olive green carpet. The only window faces north which added to the bleakness. The former home-owners used this room for out-of-season clothes storage. We weren't even sure if it was big enough to be a bedroom.


We started by tearing out the old closet. It had been built over a raised section in the floor that allowed for headroom on the stairs below. In it's place, we built a platform for her bed. We relocated the closet to the opposite end of the room. The result was a cozy corner to snuggle up in and a bed that I never have to vacuum under. The reason for writing about this room in the past-tense is because this room in this form no longer exists. Very shortly after it was completed, we found out that we were expecting our third child- a boy. This space is his room now, and is undergoing some gender-specific changes. Butterflies mobile- out. Sun and Planets mobile- in.


Design and space planning by Homemaker Interior Design.
Construction by Ross Remodeling 


8.21.2012

A Room with a View

Remodeling encounters the unexpected on a regular basis, but here is an issue that I never even imagined. When re-doing our bathroom (more than a year ago at this writing) my husband removed an old toilet. He took it to the curb to be hauled off and never to be seen again- or so we thought. Our back-door neighbor looked at what we deemed to be trash and instead saw treasure. He rescued our discarded commode and gave it a new home stashed behind his storage building. Yes, my friends, every time I look out through the back fence I see our old toilet still caught in limbo between the possibility of it's next tour of...ummm..."duty", or it’s ultimate destination on the trash heap. 

Entry Hall

"Oh sure! It's great! We can just....fix it up!"
Boy, did we have on some rose-colored glasses when we bought our house. Most (sane) people would have run away from a front entry hall that looked like this: 

But not us! We could see the potential. We could see that it was going to be lovely. What we did not see was how very lonnnnnng the road to lovely was going to be. At this writing, we have been slogging through the trenches of remodeling for about 6 years. Yes, it has been tough. No, we are not finished. BUT, (Hello, silver lining) today our front hall looks a lot more welcoming.

Happy Front Door


Changing your front door color can make a big difference! I recently painted this one from a rusty red (which I liked) to a Robin's egg blue (which I LOVE). It lightens the whole look of the house, and makes for a much friendlier front door. It's amazing how much impact one can of paint can have on the look of a house!
I also have to mention that I made those lovely throw pillows with my very own sewing-challenged hands. They were dish towels in a past life. But I sewed up three sides and filled them with stuffing and now they're my pretty porch pillows.

SSSSSooo Easy Halloween Wreath

I love-love-love Halloween, but I can't handle the typical gory decorations. I made this creepy wreath in a day and I love the way it turned out. My snake-phobic husband hates it which means it must look great. Thank you to Martha Stewart for the idea and instructions.
You'll need toy rubber snakes, a grape vine wreath form, black spray paint (I used glossy for extra Eewww!) and floral wire. Spray paint all the snakes and the wreath front and back before attaching them. I put tape over the snake's tongues so they stayed red. Once everything is dry, attach the snakes in the most wriggly way to the wreath with the floral wire. (You will need wire cutters) Finish by spray painting the whole thing again to hide the wire and any spots you may have missed. Remove the tape from the tongues and you're done. I'd love to know if you tried this and how it turned out.

Halloween Costumes 1-2-3

I may have mentioned that I LOVE HALLOWEEN. I love the challenge of finding and making costumes and this year was so much fun for me. My oldest decided that she wanted to be a witch and that set the tone for the other two. We went for classic Halloween costumes across the board. I have a witch, a ghost and a little skeleton.


My witch has some fancy flair (of course). Her hat was embellished with a bright chartreuse boa. To her lacy, witchy shirt (a Goodwill find) we added big charteuse spiral buttons. I made her no-sew skirt from black tulle and her cape was a half-slip that we tied with a satin bow. I think she looks fabulous, and her happy smile tells me she thinks so too.


My two-year-old was more challenging. She is a ghost, but again, we have flair! We are not talking about holes cut in an old sheet here. She is (in her words) a "princess ghost". I am very proud of this costume because #1- all of it was bought from our church yard sale and #2 because it doesn't show how sewing-challenged I actually am. (Fabric-Tac glue is my best friend.) 
Her dress was a crinoline slip. Her cape was a sheer curtain with ruffle trim tied with an ivory satin bow. Her hood and the sleeves of her dress were the ruffle tie-backs for the sheer curtain. I would never use these curtains as window treatments, but they make one terrific "Princess Ghost"! 


I lucked out with my 11-month-old son's costume. I scored some adorable skeleton jammies at the church sale. He's cute. He's comfortable. And I'm DONE. Trick or Treat!

Jewelry Cork Board

Jewelry boxes have never worked for me. The pieces I wear the most always wind up scattered across the top of my dresser and hanging from the mirror frame. It's messy and it bugs me every time I see it. Making a jewelry cork board has been a great solution.


I originally made this cork board to display my daughter's artwork in her bedroom. Since she bunks with baby sis now, there's no wall space big enough to continue using it in this way. So I removed the green fabric, glued down a second layer of cork, and recovered the cork with an old white bed sheet that had gotten torn. *Reduce-Reuse-Recycle* It didn't take long and it has been working really well. A pretty AND practical solution always makes me a happy homemaker.


D.I.Y. Silhouettes

I have always like the look of silhouettes. My mother-in-law has two of her sons that I think are so sweet. And when my first born came into this world with the chubbiest round cheeks I had ever seen, I vowed I would create a silhouette of that precious round face. In truth, I never got that done. I did, however, get it done for her 7 year old profile, along with her two younger siblings. So, I'm six years late on this project, but I'm still calling it a win, because they turned out so cute!

I started with some old yard sale frames and spray paint. The art was removed, and the frames got a good spray of color in the backyard. This picture shows my first idea, which was to paint each frame a different color. That looked adorable, but mid-project, I switched gears and changed the overall look of the kid's bath where they would be hanging. In the end, they were all painted yellow.

Taking the pictures for the silhouettes was very haphazard. My girls were old enough to stand still for me in front of a blank wall. Yes, their hair looks so much prettier when it's combed, but this was not going to show in the final project. These are just to show you how informal the picture taking can be, and still turn out great.


I had the hardest time capturing my toddler son at the right angle. I just chased him around with the camera until I got it. This is the photo I ended up using.
Yes, he has a boo-boo on his head. 
He's fine now, and it didn't show in the silhouette.

So, I finally got the shots. Using PicNic for editing, I was able to make all the profiles the same size, and face the same direction. Then I printed them out on card stock. Once they were printed, I cut them out, turned them over and spray painted the blank side black. I mounted them with rubber cement onto another piece of cardstock that I had printed with their names, ages and the year these were made. 

I wanted to protect them a little since they were going to hang in the kid's bathroom. I didn't have any glass to front them with, so I used a plastic sheet protector (the kind you would use in binders) to cut out the right size protective cover, and slipped that into the front of each frame followed by each picture and finally some cardboard to hold it all in tight. 


I absolutely love how this turned out. 
I plan to keep these for a good, long while.

Rainbow Party

My three kids all have winter birthdays right around the holidays. While that's a wonderful time of year, it's a stinky time for a kid's birthday party. Instead, we have a whopper, blow-out, half-birthday party for them in June. It is a lot of work, but worth it. This year, the theme was Rainbows, and was it beautiful! Honestly, what's prettier than a rainbow, right? I hope you enjoy the pictures.

Gift Bags

One of the projects that took the longest was the gift bags. At first I had trouble finding rainbow themed items that would appeal to both boys and girls. When all was said and done, though, these bags were full of wonderful stuff!

*SLINKYS* Who doesn't love a Slinky? These miniature ones came in (sort-of) rainbow colors.
*CHOCOLATE* M&M's come in every color of the rainbow and the ROLO's make the pot of gold.
Yes, I picked out all the brown ones. And for future reference, there are WAY more brown, orange and blue than there are red, yellow and green. I really like the way the little flags turned out. They say, "You're my pot of gold at the end of the rainbow". Thanks to "It Is What It Is" for the idea. http://bethproudfoot.blogspot.com/
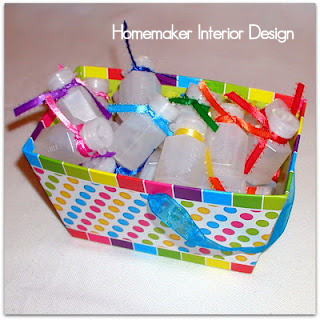
*BUBBLES* At the party we had a baby pool filled with super-duper giant bubble making soap. I made giant bubble wands and it worked beautifully until the mixture got too much grass and dirt and rowdy boy in it. So, we had fun bubbles at the party and more fun bubbles to take home. I used the left over ribbon to tie a different color on each little bottle.
*HAIR RIBBONS* As I mentioned, finding rainbow items with feminine appeal was easy peasy. Making hair ribbons was a no-brainer. I remember having hair clips attached to a rainbow of ribbons when I was a little girl. I loved them so much. I hope these will bring just as much joy to all the little girls who took them home.
*PRISM GLASSES* By far the coolest thing in the gift bag was the glasses. They were my seven-year-old's favorite. Looking at light through them creates rainbows in your vision. They're also supposed to be great fun when watching fireworks, so the timing of this gift is perfect. YAY!
*CRAYONS* Not in their original form, but melted down into these gorgeous little multicolored gems. They were just so, so pretty. They looked like candy so....
I wrapped them in cellophane, and tied tiny labels to them.
Oooooh, I just love how they turned out!
*NOTEPADS* The kids were going to need something to use those gorgeous crayons on, so I made tiny notepads out of some paint sample cards.
Voila! Gift bags. I made personalized tags and tied each bag with the rainbow ribbons.

Fun & Games

We had an inflatable pool (which was way more popular than you might think) and a slip n' slide. The kids were bigger this year, so my husband added 25 more feet of plastic sheeting to the slide- a very good call! Next year we'll just have one long, giant sheet of heavy duty plastic and do away with the store-bought slip n' slide. 

 
In order to have more water around the yard, I set out 6 huge buckets (striped with a rainbow of duct tape and filled with water) and supplied the kids with water guns and sponge balls.

Instructions for how to make these cuties can be found here:
http://onecharmingparty.com/2011/03/23/water-party-sponge-ball-tutorial/
I made one adjustment, however. Instead of tying them with dental floss, (I couldn't get it tight enough) I used very thin zip-ties, and trimmed the ties as close as I possibly could so no one would get hurt with them.
Buckets striped with rainbows of duct tape
We had a small baby pool filled with bubble soap and I made bubble wands, both the string kind and the wire kind, to make giant bubbles. It worked perfectly until the bubble solution got dirty. Unfortunately, I didn't get any pictures of the giant bubbles. There are some great pictures here (http://momenttomomentdk.blogspot.com/2010/06/huge-bubble-magic-inspired-by-childhood.html) along with instructions for how to make the string wands.


String wands with duct tape stripes for color


Wire wands with pretty beads
Trying out the string wands.
My husband spray painted dots in the grass to make an outdoor Twister game. We didn't have a spinner, so I printed up little cards with the colors and instructions to draw out of a plastic jar. To keep the jar nearby, I attached a loop to it with zip-ties (yes, I do love zip-ties) and hung it on a low tree branch.  

Lawn Twister


Right and left feet, right and left hands and HEAD!


Decorations & Food

Balloon rainbow
Crepe paper chandeliers and rainbow kites
Food table with sky blue back drop, "rain" made from silver Mardi Gras beads, and a rainbow of balloon cut-outs
Rice Krispy treats with rainbow sprinkles mixed in, meringues with a rainbow candy on top, rainbow fruit kabobs, skittles, rainbow lollies and PIZZA!
In the upper right corner are rainbow Twizzlers in cups separated by color. The cups weren't tall enough to hold the Twizzlers up, so they drooped over the sides like rainbow octopi. Meh! Good 'nuff.
Party blow outs and water bottles wrapped with rainbow colored duct tape
Gift bag table with take-home cd's of the party music. In lieu of birthday gifts, we asked for donations to be made to a local homeless network. http://ihnjc.com/
No matter how fabulous, no day is immune from a tantrum. *sigh*
This just made me laugh. Who else has seven giant daisies in their kitchen for a week?